Showing posts with label ipad. Show all posts

Saturday, April 11, 2015

Elements of Art Super Heroes

Fourth grade students did a great job creating these fun superheroes inspired by an element of art.  After reviewing the elements of art we brainstormed ideas.  I loved hearing all the creative powers they came up with.  We used sharpie to outline our drawings and then crayons and liquid watercolors to add color.  We also used the ComicBook! app on the iPads to create comic book pages sharing what our superheroes power was.  Here are some of the finished pieces.  You can see the exhibit on Artsonia here:http://www.artsonia.com/museum/gallery.asp?exhibit=934637


Tuesday, March 17, 2015

Second Grade Self-Portraits and Chatterpix Kids

My second grade students just finished their self-portraits.  After looking at a variety of portraits and sketching practice students were asked to create a self-portrait that communicates personal interests. They were also asked to choose what painting material they wanted to use.  We spent a class period practicing with both mediums and then discussed the qualities of both.  Most of the kids chose tempera paint for their portraits.  They found the watercolors frustrating.  This project was quite the challenge but the kids did a great job.  I found a great app called ChatterPix.   It's a photo app that allows you to make your image talk.  You can also add filters, text and stickers.  This app was easy to use and a great way for students to present their artwork and discuss what was meaningful to them.  Once each student made their individual ChatterPix I used iMovie on the iPad to put them together into one little movie.  Here are a few pictures of our self-portraits and examples of ChatterPix.  You can see all of the class movies here:https://sites.google.com/a/bownet.org/besart1/home/grade-2
  

Monday, January 19, 2015

Classroom Mode on Artsonia

I have been using Artsonia for about 9 years now and love it.  It is a great way to showcase student artwork as well as keep parents informed.  Check it out at  http://www.artsonia.com/.  Each one of my students has their own digital portfolio with all of their artwork in it.  I have 18 classes with about 20 students on average so it can get overwhelming some times.  However, I think it is well worth it.  Artsonia came out with a new feature called Classroom Mode.  This allows me to save time by  having students upload their artwork & statements.  Starting this year my third and fourth grade students use the ipads to upload their artwork to the site themselves.  It's a great time saver and it also teaches the kids how to photograph their artwork and also add titles and artist statements.  I just print the QR code that Artsonia assigns to each of my exhibits and then the students scan the code which brings them to the Artsonia site.  They choose their name, take and upload and edit their photo as well as add titles and artist statements if they choose.  In the beginning it took a little extra time teaching them the process but now they are getting really good at it.  
Another great feature is that you preview the entry before it is posted to the site.  I can make corrections to the image and/or artist statement and publish it immediately, or send it back to the student for corrections.  Right now not many of my students are choosing to write artist statements, we are still working towards that.  I have 5 ipads to use and we don't always have time.  I have loved reading some of the statements that the kids have written though.  It has great potential for a reflection piece in class. 


Friday, May 23, 2014

Recycled Cardboard Faces

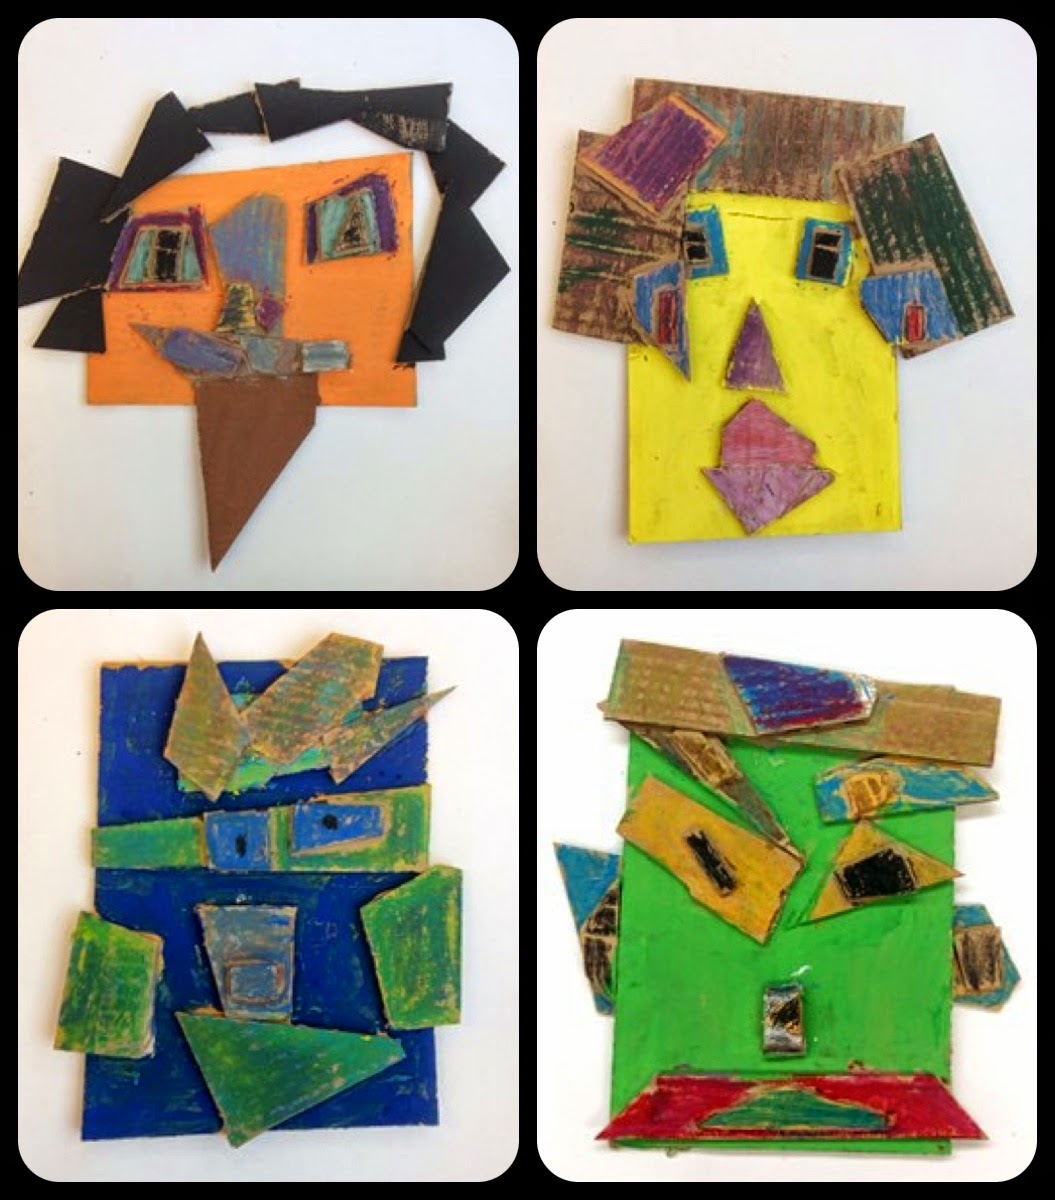
First grade students learned about creating art from recycled materials or found objects.  We looked at found object FACES made by artist Jim Shores.  You can see his work at https://www.flickr.com/photos/jimshoresart/sets/1007675/. 
We also looked at the Faces iMake app for the iPad.  There are some cute, short videos that show how to arrange objects in different ways to create faces.  
I randomly cut scraps of cardboard on the paper cutter in a variety of sizes.  We spent one class just experimenting with using the shapes to create different faces and showing different emotions.  
The next class students created their final design and glued it together.  We use tempera paint to paint the face and blended cray-pa for the features. 
Students also got a chance to use the Faces iMake app on the ipad to create a face too.
Here are some of our finished pieces:


Sunday, May 4, 2014

Pixel Portraits

Second grade students had fun creating pixel portraits using graph paper and the iPad app Pixel Booth.  At first it was a little bit of a challenge to think of making their people using the square shape instead of using lines.  I also found an online pixel drawing site that the kids could use on my Smart Board.  Students took turns using the iPad app while they were drawing on the graph paper.  I think they turned out great and the kids had a lot of fun making them.


Thursday, December 26, 2013

Winter Starry Night

My second grade students looked at Vincent van Gogh's Starry Night picture.  We used cray-pa and watercolor resist to create our night skies and then collaged our trees and villages on top.  Details were then added with color pencil. We also used white paint for snow and a little glitter glue to add sparkle to the moon and stars. 
I tried to encourage my students to add some things that they noticed about van Gogh's artwork into their own.  Many of them added texture, used different lines similar to his brushstrokes, and added different shades of colors in the sky, stars and trees.


As a review we used the app Popplet on the iPad to make mind-maps about what inspired them about starry night.


Sunday, September 29, 2013

Art Room Robots - Grade 2

  Students designed robots to help out in the art room.  We talked about all of the materials we use in art and what types of clean up jobs our robots could do. Our robots clean the floor, the paintbrushes, sharpen pencils, stack chairs, pick up clay scraps, unclog glue bottles and lots of other helpful jobs.  We really tried to make sure that the details in our pictures helped show the robots job.  


I used the Fotobabble app on the ipad as a way for students to share their robots with others.  Fotobabble is an easy app that adds sound to any photo.  Once I had their photos and recordings I made QR codes that linked their artwork to the recording.  I printed the codes and attached them to the artwork. During class I allowed 4 students at a time to scan the codes and listen to other classes robots.
QR Code

Sunday, June 16, 2013

Popplet in Art

Second grade students experimented with art materials and the Popplet app on the ipads.  Our first art class was spent experimenting with the art materials.  I made two stations, one with watercolors and one with cray-pa.  I asked the kids to experiment with different ways to use the materials and write down things that they discovered.  These are not new to use, we have used cray-pa and watercolors before but the focus was on using the materials in different ways and not what their papers looked like.  After half of the class the kids switched to the other art material.
The next art class I laid out our practice papers and their writing pages and introduced them to the application Popplet on the ipad.  We talked about what a mind map is and how we can create them using this app.  Popplet is a fun and easy app to use.  The kids were able to use it very easily.  I paired them up and each group chose one of the art materials to make a mind map about.  I asked them to come up with four qualities about their art material for their Popplet.  We only have a 40minute class so I had to limit them so that we would be able to save them to the camera roll and then upload to Dropbox.  I highly recommend this app and I am looking forward to using it in the art room again next year.  Here are some of our finished Popplets:


The next art class I let students make a finished piece of art using one or both of the art materials thinking about applying some of the things they learned in their practice.  Here are a few of their pictures.  This was our last art class of the year so I think the results might be even better if we had more time and no summer fever :)


Wednesday, February 27, 2013

Stop Motion Animation


My third grade students are having so much fun learning about stop-motion animation.  We are using an app on the ipad called My Create.  It is from the makers of SAM Animation.  It is a little pricey but works really well.  You can also add music and your own voice if you want.  I chose not to have the kids add any sound because I was going to piece all of their little movies together in imovie and thought it might be distracting with all the different sounds.  Also, we have a large screen tv in our library to display our movies  but cannot have any sound.  I just wanted to introduce them to the process of stop motion animation and this project was perfect. 
The first class I introduced the lesson and students practiced drawing different sea creatures.  Some chose to create realistic ones and others were more imaginative.  Final drawings were made, outlined in sharpie, and colored in using color pencil.  I asked them to experiment with the color pencils trying some blending, shading, textures or patterns.  We created the ocean backgrounds using liquid watercolors and salt.
All of the filming was done in one 40 minute class.  I wanted to make something to hold the ipad and keep it steady while they took the pictures.  I found a few tips online about creating stands that would allow the ipad to become a document camera.  I wanted something easy and inexpensive so I ended up using metal shelving from Lowe's for 6$ a piece and milk crates.  They worked great.

We saved all of our movies to Dropbox and then I was able to import them into imovie and piece them all together.  I shared some free stop-motion animation apps with my students and many of them have made their own movies at home.  We are going to use our ocean backgrounds and sea creatures from this project to create underwater collages.  I will post the collages when they are finished.  


Sunday, February 3, 2013

The Clean-up Comics

We had some fun using the ComicBook! app in art class.  Students were given the assignment to create a short comic that would teach the younger students some of our clean-up procedures in art.  We started by using a blank template to storyboard our ideas.  Next, students drew pictures, made props, or figured out how they were going to photograph their story.  Some students chose to work in groups which was a little easier for them to set up and take the pictures.  The next class we brought the ipads in and turned our storyboards into comics.  ComicBook!  is a great app.  It does cost $1.99 but I think it is worth it.  I tried looking for free comic apps but they just weren't that great.  This app has fun photo effects, speech bubbles, stickers and lots of layouts.  They kids had a blast.  Here are a few of the finished comics that didn't have any photos of kids in them.  
Here are examples of our story boards: 


Final comics:


Saturday, January 19, 2013

Andy Warhol Soup Cans

Third grade students looked at Andy Warhol's soup can artwork.  We learned how to draw cylinders and created our own kind of soup using an adjective that describe ourselves. 
We also learned about the silkscreen process.  I found some great websites about Warhol's soup cans and also one where you can make your own Pop art and learn about the silk screen process: http://edu.warhol.org/silkscreen/main.html.  The MOMA museum website has a short video 
about the soup can paintings that I showed my students to introduce the lesson:http://www.moma.org/collection/object.php?object_id=79809   When the drawings were complete we photographed them with the ipads and used the Posterize app to give them a more silk screen look.  Here are a few more great resources:  http://en.wikipedia.org/wiki/Campbell's_Soup_Cans

http://www.yatzer.com/Let-s-Make-Some-Great-Art-by-Marion-Deuchars


Saturday, October 20, 2012

Radial Symmetry

I love creating radial designs with my students.  This is a lesson that I saw awhile ago and always wanted to do with my students.   The Students created one section of their design using lines that connect to the sides of the shape and then traced them onto their remaining pieces.  I asked students to choose a color scheme for their designs.  We talked about warm and cool colors, primary and secondary colors, complementary colors and analogous colors.  While students were working on their designs we took turns using the Doodle Dandy app on the ipad.  This is a fun app that allows students to create all different kinds of radial designs.  You can change the pen size, color, and number of symmetry.  The kids loved it.  At the end of the lesson we used the ipads and the infuse learning website to review our knowlege of color schemes.  Infuse learning is an ipad student response system.  I love it because I can display an image onto my smartboard, ask my students questions and they can draw onto that image on the ipad to show me their understanding.  I projected a color wheel onto my smartboard and asked my students some questions like; circle the warm colors or put an X onto the primary colors.  The students had fun and I got to see what they learned about color.


Saturday, October 13, 2012

Pumpkin Paintings- Tempera and ipads


Second grade students were painting pumpkins.  We talked about how we could use value to make our pumpkins look more three-dimensional.  Students painted their pumpkins using light, medium and dark shades of orange.  We also talked about blending the colors together using our paintbrush.  I found a free painting app on the ipad called Hello Oil Painter.  The students were able to practice the same painting techniques on the ipad without the mess.  The app is really amazing.  It has a paint palette and you can virtually mix colors just like you would with real paint.