I love these colorful painted fish created by my first grade students. We read the book Fish Eyes by Lois Ehlert. There are a lot of great fish inspiration in it and the kids love to read it. To get started I made some drawing pages to help them. There were ideas for body shapes, fins and other fish details. Students made sketches in pencil first and then black tempera paint on large paper. We talked about the differences in drawing their fish in pencil and then using a brush. The next class the kids used colorful tempera to fill in the fish and add any background details. The following class the background was painted using liquid watercolors. I love how colorful they are and how creative student were when drawing their fish. It was also a great project for the kids to use tempera and watercolor paints. Here are some of the finished pieces. If you would like to see them all you can visit our online gallery here: http://www.artsonia.com/museum/gallery.asp?project=1131832
Showing posts with label Grade 1. Show all posts
Sunday, June 12, 2016
Sunday, March 20, 2016
Color Mixing Fun Grade 1
I'm always looking for different ways to let my first grade students practice mixing colors. The first day we talked about the primary colors and how we can use them to mix other colors on the color wheel. I demonstrated how to mix colors using model magic clay, which the kids always think is so amazing, and a palette and watercolors. I split the class up into groups. Half of them practiced mixing with the paint and half of the class mixed with clay and then the two groups switched. Some of the kids were even able to mix some of the intermediate colors. I saved the colors we mixed with the model magic for the next class. When the kids came in next time we used the model magic and tooth picks
to create these colorful sculptures. Some of the kids had a hard time
getting their sculptures to stay up as they build but everyone still had
a great time. I'm not sure if they made it home in one piece but they
definitely learned a lot about color mixing.
Sunday, February 15, 2015
Kindness Quilts
I love doing collaborative projects and this one is a new favorite which I hope continues throughout the years. The library media specialist and I noticed that we did similar projects and decided to combine them into an integrated lesson. This is the blog post for my Bedtime Story Quilts.
Our library media specialist does a Kindness quilt project with her first grade students based on the book The Kindness Quilt, a story of Random acts of kindness pictured on a paper quilt. Students thought about ideas for their own on acts of kindness, created a drawing and used the iPads to photograph their drawing and record a sentence about their drawing. The library media specialist then created QR codes for each of the groups. Students were able to scan the codes and listen to all of the projects.
This year the kids read the story and brainstormed ideas during library time while working on the quilt in art. The kids came to art with their planning sheet and I helped them create their final drawing and border for the quilt. We talked about zooming in and drawing larger for the final copy as well as adding details to illustrate their act of kindness. The quilt squares were made using crayon resist. We created patterns on white paper and then painted over them with liquid watercolors. The finished pieces went back to the library where the kids photographed them and used the app Puppet Edu to record their sentences. The kids did a great job and the quilts look beautiful in the hallway.
Our library media specialist does a Kindness quilt project with her first grade students based on the book The Kindness Quilt, a story of Random acts of kindness pictured on a paper quilt. Students thought about ideas for their own on acts of kindness, created a drawing and used the iPads to photograph their drawing and record a sentence about their drawing. The library media specialist then created QR codes for each of the groups. Students were able to scan the codes and listen to all of the projects.
This year the kids read the story and brainstormed ideas during library time while working on the quilt in art. The kids came to art with their planning sheet and I helped them create their final drawing and border for the quilt. We talked about zooming in and drawing larger for the final copy as well as adding details to illustrate their act of kindness. The quilt squares were made using crayon resist. We created patterns on white paper and then painted over them with liquid watercolors. The finished pieces went back to the library where the kids photographed them and used the app Puppet Edu to record their sentences. The kids did a great job and the quilts look beautiful in the hallway.
Monday, February 9, 2015
Winter Cardinals Grade 1
I have been photographing the cardinals visiting my bird feeders this year and thought my first grade students would love to see them. After looking at the pictures and hearing stories about other backyard bird feeders we sketched some cardinals. I had photographs for them to look at as well as some easy how to draw sheets I found on the internet. Once the sketches were done we drew our final copy on blue construction paper and used tempera paint to add color. We looked at the cardinal photos and observed the different shades of red. I mixed up a light, medium and dark shade for the kids to use when painting. Once the paint dried we used cray-pas to add the branches. We talked about a variety of trees you would see and the kids chose which ones they wanted to use. We tried to blend different shades of the tree colors with the cray-pa. The final detail was adding snow with white tempera paint.
Friday, May 23, 2014
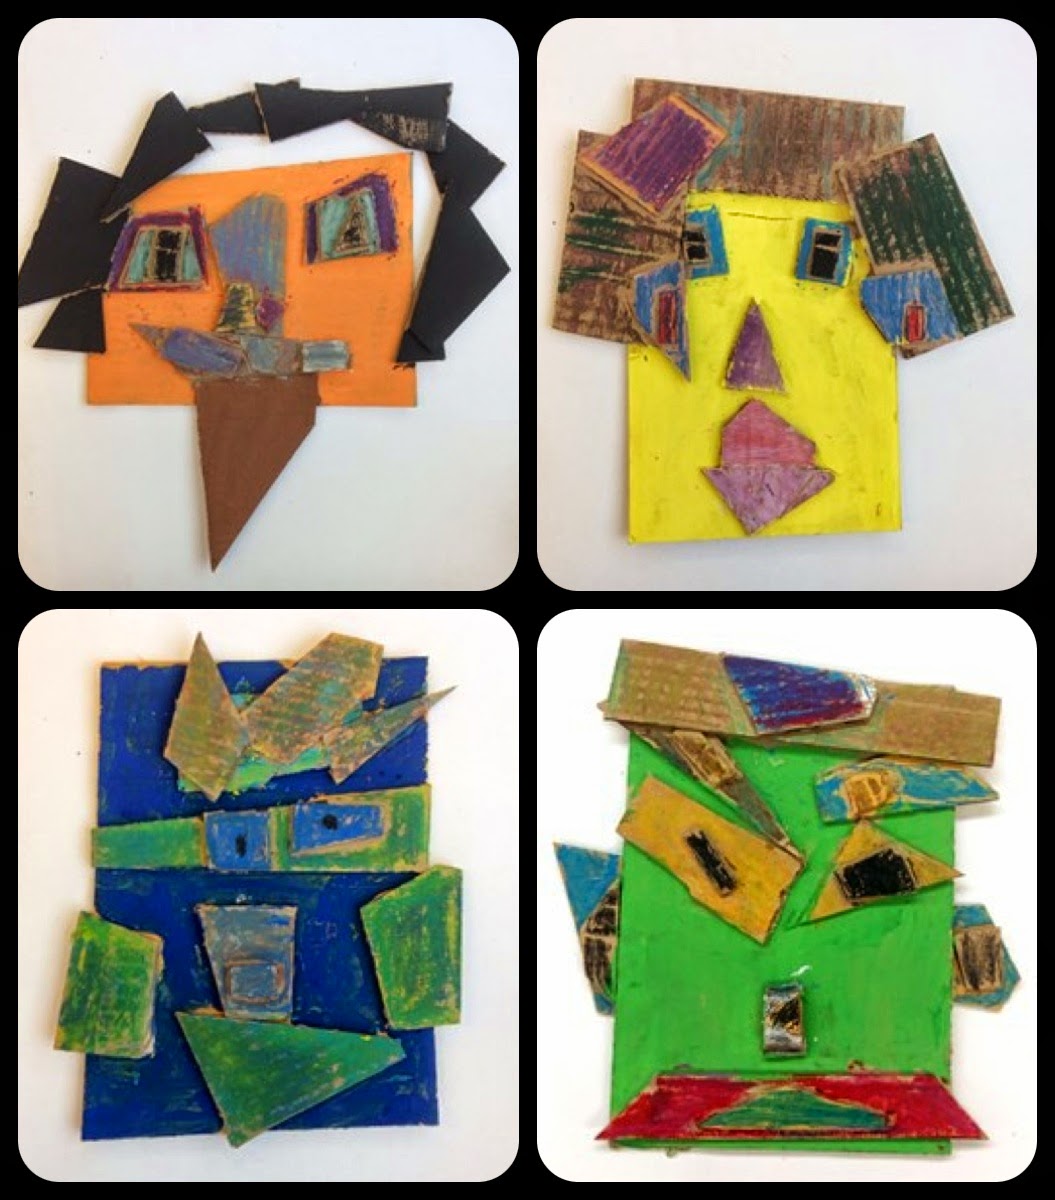
Recycled Cardboard Faces
First grade students learned about creating art from recycled materials or found objects. We looked at found object FACES made by artist Jim Shores. You can see his work at https://www.flickr.com/photos/jimshoresart/sets/1007675/.
We also looked at the Faces iMake app for the iPad. There are some cute, short videos that show how to arrange objects in different ways to create faces.
I randomly cut scraps of cardboard on the paper cutter in a variety of sizes. We spent one class just experimenting with using the shapes to create different faces and showing different emotions.
The next class students created their final design and glued it together. We use tempera paint to paint the face and blended cray-pa for the features.
Students also got a chance to use the Faces iMake app on the ipad to create a face too.
Here are some of our finished pieces:
We also looked at the Faces iMake app for the iPad. There are some cute, short videos that show how to arrange objects in different ways to create faces.
I randomly cut scraps of cardboard on the paper cutter in a variety of sizes. We spent one class just experimenting with using the shapes to create different faces and showing different emotions.
The next class students created their final design and glued it together. We use tempera paint to paint the face and blended cray-pa for the features.
Students also got a chance to use the Faces iMake app on the ipad to create a face too.
Here are some of our finished pieces:
Saturday, April 5, 2014
Bedtime Story Quilts
First graders do a concert every year at our school called Dreaming Around the World. I thought this project would be great to go along with the bedtime theme. We looked at Faith Ringgold's story quilts and talked about our favorite things about bedtime and then drew pictures about it. We also looked at pattern and how to use lines to create patterns. Each student had 5 strips of paper and used crayons to create patterns on them. We painted a watercolor wash over them. When they were dry I cut them up into 4 inch squares to use as the border. Check out our finished artwork.
Wednesday, December 11, 2013
Clay Texture Hands
First grade students had fun experimenting with creating textures in clay. Each students made 2 hands; one to keep for a small bowl and 1 to be part of a class bowl. I had a senior from the high school come and do this project with us. She created the bowl with the kids extra hand. The extra hand gave the kids a chance to experiment a little more. They were also given a small piece of practice clay to use before they started with their hands. This was also a great introduction to the clay process. They learned about the kiln and the glazes.
I saw this idea on Pinterest this summer and when I was asked to have a senior come and work with students I knew this would be a great project for it. Here are the two links that I found on Pinterest.
http://krokotak.com/2013/03/three-little-clay-presents/
http://www.studioartsdallas.com/gallery-auction.php
I saw this idea on Pinterest this summer and when I was asked to have a senior come and work with students I knew this would be a great project for it. Here are the two links that I found on Pinterest.
http://krokotak.com/2013/03/three-little-clay-presents/
http://www.studioartsdallas.com/gallery-auction.php
Saturday, October 12, 2013
Free-form Shape Monsters
First grade students were learning about shapes. We talked about the difference between free-form and geometric shapes. After practicing drawing free-form shapes students drew 1 large one on construction paper and cut it out. I didn't tell them what we were going to do with it yet. After the shape was cut out and glued to white paper I read the story, "If you're a Monster and You Know it" by Rebecca Emberley.
There is also a song that you can download and play. The kids had fun singing and acting the book out.
The next class we turned our free form shapes into monsters. We brainstormed all kinds of details that could be added. We used pencil and sharpie for this part. Finally, we added color with construction paper crayons. Here is a link to some other monster books for kids.
Look at the fun and creative monsters we came up with!
Sunday, May 26, 2013
First Grade and NH Animals
First grade students at our school study NH animals. Every year the kids create their animal out of Model Magic. Usually we create 3D animals but this year I decided to have them create a relief of their animal onto cardboard. See my earlier post on how we made them.
The students made careful sketches of their animal before we made them out of clay. We used those sketches to trace onto foam plates and make NH animal prints. We talked about basic printmaking tools; brayer, ink and bench hook. This was a very exciting process for the kids to watch.
We also helped make habitat murals for their classrooms. We used large paper and cray-pa to draw details for pond, field and forest habitats and then liquid watercolors to fill in the background. We got another use out of our animal sketches. We colored them in and glued them into the mural and used scraps to add more details.
The students made careful sketches of their animal before we made them out of clay. We used those sketches to trace onto foam plates and make NH animal prints. We talked about basic printmaking tools; brayer, ink and bench hook. This was a very exciting process for the kids to watch.
We also helped make habitat murals for their classrooms. We used large paper and cray-pa to draw details for pond, field and forest habitats and then liquid watercolors to fill in the background. We got another use out of our animal sketches. We colored them in and glued them into the mural and used scraps to add more details.
![]() |
| NH Animal Relief |
![]() |
| NH Animal Prints |
Sunday, May 5, 2013
Snapguide App
I found this great app called Snapguide. Snapguide is a way to share and view step-by-step how to guides. You can also create your own guides and share what you love making with your friends on Twitter, Facebook and more.
I made a quick how-to guide for my first grade students to try it out. You can add photos, text and video. I love that you can share it, embed it in a blog, or even print it out.
I think this would app would have a lot of great applications in any classroom. I think it would be fun to have students create their own Snapguides as well. My 8 year old son made one on how to make an origami Yoda and he had a lot of fun. I look forward to using this with my students.
I made a quick how-to guide for my first grade students to try it out. You can add photos, text and video. I love that you can share it, embed it in a blog, or even print it out.
I think this would app would have a lot of great applications in any classroom. I think it would be fun to have students create their own Snapguides as well. My 8 year old son made one on how to make an origami Yoda and he had a lot of fun. I look forward to using this with my students.
Saturday, February 16, 2013
African Textiles
In March our school is having an artist in Residence who will be teaching us about African Drumming which inspired us to create artwork about African Textiles. First grade students learned about Kente Cloth. We watched a video of an African boy weaving and looked at lots of pictures of the woven cloth. Students created their strips and decorated them using different types of lines and then wove them into a black piece of paper. I saw a version of this lesson on Artsonia. Here is the link: http://www.artsonia.com/museum/art.asp?id=15678256&exhibit=447434&gallery=y
Second grade students created printed patterns inspired by African Mudcloth. I found this great site that explains the process of making the cloth: http://www.mnh.si.edu/africanvoices/mudcloth/index_flash.html
We used cardboard and white paint to print the patterns and oil pastels to add some color. Here is a little video of a student working on their pattern. I used the imotion HD app on the ipad to make it.
Second grade students created printed patterns inspired by African Mudcloth. I found this great site that explains the process of making the cloth: http://www.mnh.si.edu/africanvoices/mudcloth/index_flash.html
We used cardboard and white paint to print the patterns and oil pastels to add some color. Here is a little video of a student working on their pattern. I used the imotion HD app on the ipad to make it.
Fourth grade students looked at Adinkra cloth. We watched a few youtube videos of the cloth being stamped as well as some photographs of the cloth and stamps. I printed a sheet of the Adinkra symbols and their meanings for my students to use. Each student chose a piece of cloth (recycled from a past project) and used the symbols and sharpie to decorate their cloth. The students will wear these when they are doing their drumming.
Wednesday, January 23, 2013
First Grade Winter Birds
One of my favorite things to do in the winter is photograph the birds that come to our feeders. I showed my students some of the photographs that I have taken to introduce the project. I also get Birds and Blooms magazine so I had plenty of bird pictures for them to look at. The students also loved sharing their own winter bird sightings.
We started off making practice sketches of our birds. We brainstormed different ways to sketch them, looking at the basic shapes or at the contours were some ideas. Deep Space Sparkle http://www.deepspacesparkle.com/blog/ is one of my favorite blogs that I go to for inspiration and tips. One of the posts that I read was about not letting children use pencil for their artwork because they draw so small. This is something that I struggle as well. To many times I see my students make these beautifully detailed pencil sketches and then they disappear as soon as they add color. I definitely wanted to give her ideas a try and I thought this project would be perfect.
I wanted to give my students time to practice first with pencil but then when they felt ready I gave them final paper and a black crayon to draw their bird. We talked about strategies for fixing mistakes that were made with black crayon. The kids did great with this. Next I had them outline their crayon in black tempera. This helps their details stand out when they paint. (another tip from deep space sparkle). Next we drew and painted our branches, painted our birds and the final touch, adding snow falling and on the branches. I pre-mixed paint for the bird colors and sat students together by bird with more photos. That way they could really look at the birds patterns and details. I think they turned out great and will definitely keep using crayon and outlining with black paint.
Sunday, December 9, 2012
Model Magic People
First grade students worked with model magic clay creating these fun clay people. We talked about different ways that we could roll, pinch, or stretch the clay to make the body parts. We also talked about the difference between 2D and 3D artwork. I love using model magic with my students. It is a fun, non-messy way to practice handbuilding techniques.
Thursday, November 1, 2012
Fun with Texture
First grade students had fun learning about texture by pressing objects into slabs of clay. It is always so exciting to see the impressions that the different objects make. Some of the favorites were the plastic bugs and bead necklaces. This is part of our texture unit. We created rubbings from objects around the room and texture plates, these clay bowls and also experimented with creating textures on paper by rolling, crumpling and folding. We used the textured paper to create relief sculptures.

Examples of Paper Texture Sculptures Grade 1
Subscribe to:
Posts (Atom)