Sunday, November 9, 2014

Clay Owls- Two different Ways

Second grade students created clay owls after working on their Owl Close Up pictures in cray-pa.  Last year we made these from slabs of clay and this year was going to be the same...until my slab roller broke and I had only enough for 2 of my four classes.  I looked online and found another owl project made more like a pinch pot and decided to give it a try.  I found this great website that had pictures of the process.  If you ever teach a project about birds this site is amazing; http://redandthepeanut.blogspot.com/2013/09/how-to-make-ceramic-pottery-owl-out-of.html
Both types of owls came out great.  I think the slab owls are easier for the kids but I think most of them would have chosen the 3D one.  They both allowed for the kids to practice attaching clay with slip and score and were a great review of adding texture and a great follow up to our 2D owl project.

Here are a few of them:

Collage People

While looking around on Pinterest I came upon the artist MALIN KOORT.  We looked at her amazing paper illustrations.  Check her out here:  http://malinkoort.blogspot.se/.  The kids really enjoyed looking at her work and were very inspired.  We started out by making a paper person but soon the kids were into creating little environments for them.  It was very difficult to take pictures of them but here are a few views.  


Saturday, November 1, 2014

Lego Minifigure Self Portraits

This project was a lot of fun.  Everyone loves lego minifigures.  I asked my fourth grade students to create a self-portrait minifigure style.  They had to include things that represent themselves into their picture. We used cardboard to create layers and give some dimension.  The relief made it easy to talk about foreground, middleground and background.  We also talked about value.  Students created value scales and then tried to color the foreground the darkest value, middleground a medium value and the background the lightest. 

Tuesday, October 14, 2014

Owl Close Ups

Second grade students worked on zooming in on an object when drawing.  We also looked at some great owl paintings I found on Etsy. Each student chose an owl photograph to look at and practiced sketching enlarged views.   Final drawings were put on brown construction paper and we used oil pastels to add color.  The focus was on observing the colors, patterns and textures of the owls.  

Friday, May 23, 2014

Sunflower Paintings

Third grade students learned about the sunflower paintings by Vincent van Gogh.  I found a great site called Art History Mom that gave some great kid-friendly information about his paintings.  Check it out at:http://www.arthistorymom.com/post-impressionism/a-flower-delivery-to-you-and-your-kids-from-vincent-van-gogh/
I love this project.  They always turn out great and the kids learn a lot.  We talked about painting with brushstrokes, variety, overlapping and value.  Here are some of our finished paintings.  


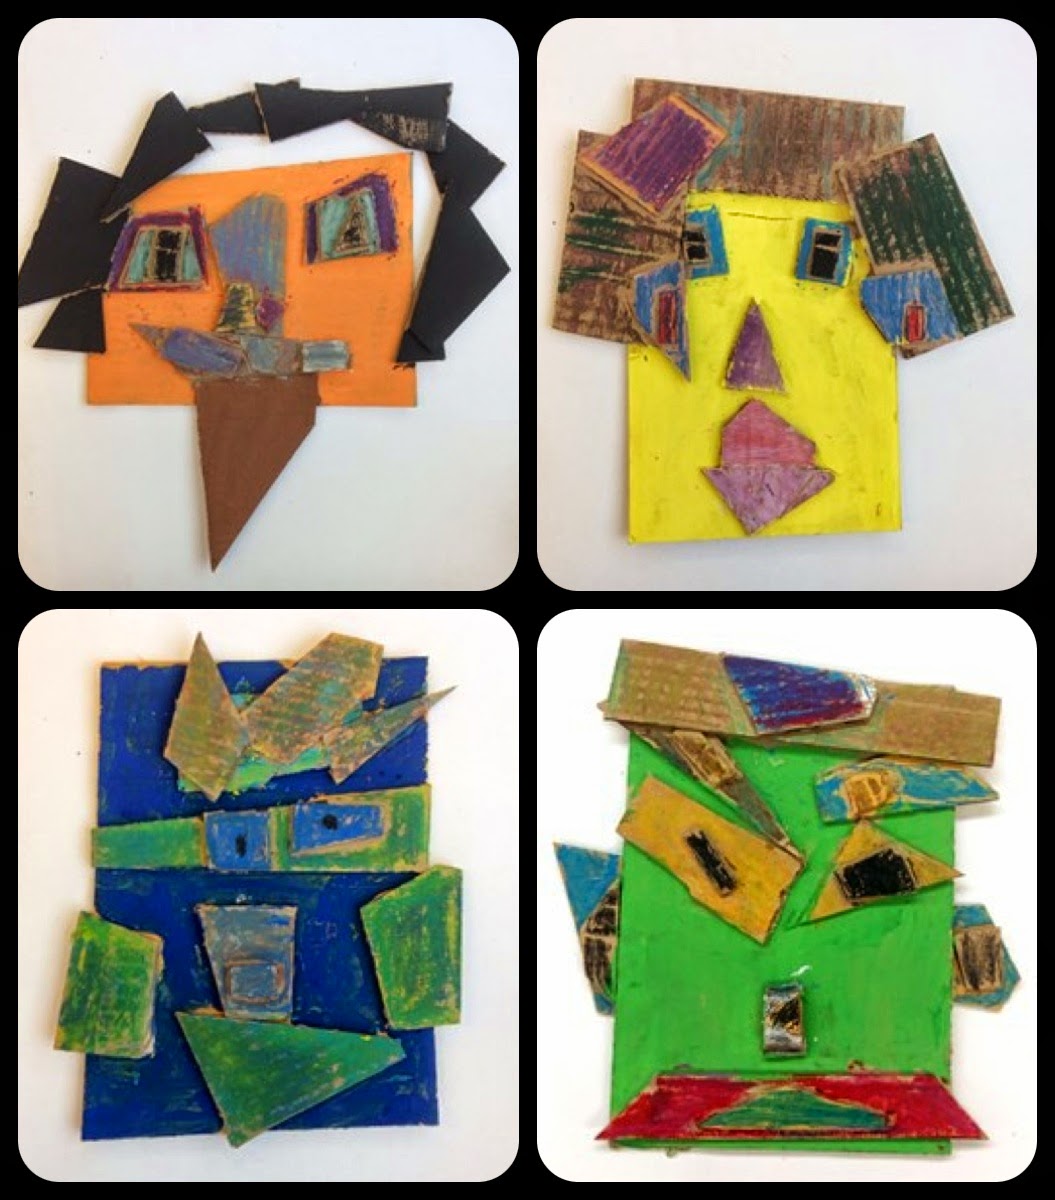
Recycled Cardboard Faces

First grade students learned about creating art from recycled materials or found objects.  We looked at found object FACES made by artist Jim Shores.  You can see his work at https://www.flickr.com/photos/jimshoresart/sets/1007675/
We also looked at the Faces iMake app for the iPad.  There are some cute, short videos that show how to arrange objects in different ways to create faces.  
I randomly cut scraps of cardboard on the paper cutter in a variety of sizes.  We spent one class just experimenting with using the shapes to create different faces and showing different emotions.  
The next class students created their final design and glued it together.  We use tempera paint to paint the face and blended cray-pa for the features. 
Students also got a chance to use the Faces iMake app on the ipad to create a face too.
Here are some of our finished pieces:


Sunday, May 4, 2014

Pixel Portraits

Second grade students had fun creating pixel portraits using graph paper and the iPad app Pixel Booth.  At first it was a little bit of a challenge to think of making their people using the square shape instead of using lines.  I also found an online pixel drawing site that the kids could use on my Smart Board.  Students took turns using the iPad app while they were drawing on the graph paper.  I think they turned out great and the kids had a lot of fun making them.


Saturday, April 5, 2014

Bedtime Story Quilts

First graders do a concert every year at our school called Dreaming Around the World.  I thought this project would be great to go along with the bedtime theme.  We looked at Faith Ringgold's story quilts and talked about our favorite things about bedtime and then drew pictures about it.  We also looked at pattern and how to use lines to create patterns.  Each student had 5 strips of paper and used crayons to create patterns on them.  We painted a watercolor wash over them.  When they were dry I cut them up into 4 inch squares to use as the border.  Check out our finished artwork.  

Wednesday, February 26, 2014

4th Grade Color Super Heroes

When my son was in first grade he made a project with the theme Primary Color Super Heroes.  I loved the idea and knew that I wanted to do something with my kids using this theme too.  I thought it would be perfect for my tinfoil people project that I had planned for fourth grade this year.  
In class we reviewed the color wheel(primary, secondary, intermediate colors) as well as warm, cool, analogous and complementary colors.  We also talked about tints and shades.  It was a lot of information but we had talked about all of it at different times throughout the years.  
Their challenge was to create a super hero that had a power that was connected to color somehow.  The kids had a great time coming up with different powers but the challenge was linking it to the color wheel.  We had some really creative powers.
The armature for the super hero was made from heavy duty aluminum foil.  Here are some directions I found on Pinterest.  Here is a link with great directions:http://2peasandadog.blogspot.ca/2013/03/tinfoil-sculpture-art-lesson.html

Once the armature was made we covered them with paper mache.  This was a little challenging for the kids but they did a good job with it.  
The kids made sketches of the ideas so they were able to refer to them when it came time to paint and decorate their superheroes.  I had a variety of odds and ends that they could use for capes and other decorations.  They really enjoyed this part.  We used cardboard to create stands for them too.
Here are some of the finished pieces.

Some sketches


Our final part of the project was to use the ipad app ComicBook! to create a comic page of our super hero telling about them and their powers.  This is a great app and the kids had fun with it.  Here are some of their comic book pages.


Wednesday, February 5, 2014

Color Wheels and iPads

Third grade students had some fun learning about the color wheel and how to mix the secondary and intermediate colors.  First we used tempera paint in the primary colors to paint a color wheel.  I gave them a blank template for this.  Next, we used a variety of circles (yogurt and other types of covers) to create a design on 12x 18 paper.  We talked about overlapping, filling our space and having some of our shapes going off of the paper.  Students could also add a few ruler lines to break up the background if they wanted to.  A black crayon was used to trace the final design before painting.  We used watercolor paints to fill in the shapes.  I gave each student just the primary colors again and a check list with the secondary and intermediate colors on it.  Students had to mix all of the colors on the list for their paintings.  When the paintings were dry we attached the colors wheels using 3D O's.  
As a review we also played the color mixing game on the smart board and I also made a color quiz using Google Forms that students took at the end of the project.  Google forms is a great assessment tool. I'll share more about how we use this in class in another post.  


I found this great website on Pinterest about iPads in art that I found really interesting.  I loved the idea of editing a picture using multiple apps.  I had played around with it a little before and thought that this would be the perfect project to do it with.  I chose 6 apps for the kids to use.  They photographed their painting and then could use any of the apps in any order and combination to edit and change their photo. The six apps that were used are:  Etchings, Glaze, DistressedFX, Percolator, Tangled FX and Snapseed.  Each photo was saved to the camera roll and then all of the finished photos were saved in their Google accounts.  Here are some of our results.  Aren't they amazing?


Sunday, January 26, 2014

Second Grade Snow Angels

I found this great art project at Deep Space Sparkle, an art blog that I love to read.  As soon as I saw it I knew I had to do it with my kids.  It was the prefect winter project.  I purchased the book and lesson from the site.  I highly recommend her site.  She has lots of great lesson ideas for art teachers but also lots of great ideas parents could do at home with their kids.  
This lesson was great for teaching value and symmetry as well as practicing  painting and collage techniques.  The kids had a great time creating and they all came out great.  Here are a few of them.  To see them all  just visit our project page on Artsonia.